GIT tutorial
Stats Chats
April 24 2017
GIT tutorial
Today we will go through the very basic elements of GIT.
Q Why do we want version control?
Q What is GIT?
GIT n. An unpleasant or contemptible person.
GIT n. A widely used distributed version control system.
Q What is the difference between GIT and github?
Overview of GIT
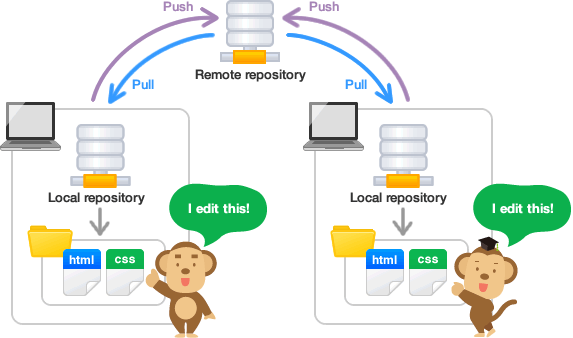
Let’s walk through the basics of GIT
NOTE: github offers a “desktop” software which acts as a GUI for the basic GIT operations. But if you want to use GIT you should have a basic knowledge of the GIT command line. So let’s start there!
Online GIT tutorial
Click on this link to access a basic tutorial on the GIT command line.
Much more information can be found here
Step 1: Get GIT!!
The easiest way to do this is to download the github desktop software
This should download the GIT desktop software AND the GIT bash emulator for windows (if you want to use the command line!).
NOTE: you can set the directory location for ‘git.exe’ in your environment variables, and then you can access GIT from any command shell!
Step 1: Get github!
If you don’t already have a github account, go to github.com
GIT tutorial #2: this time it’s for real!
The easiest way to create a new repository is through the github desktop software. So that’s what we will do first.
- Go to github and log in.
- Open github desktop and sign in. You only have to do this once- next time you open github desktop it will remember you!
- Create a new directory on your computer to hold a local copy of a new github repository. Name the repository “Tutorial”
NOTE: I have a GIT directory on my computer where all my local GIT repositories live… I use something like
C:\GITYou can do whatever you want though!
Go to github desktop and click on the ‘plus’ sign in the upper left corner. Go to the ‘add’ tab and browse to the new folder you created. This tells github desktop that you want to create a new repository in this directory.
Navigate to the new repository in the left hand menu on github desktop. Click on it. Then click on the ‘Publish’ button (top right corner of the window). This will create a new cloud-based repository on github.com that will store all the content of your new repository. Go to github.com to make sure your new repository is there.
NOTE: you could have created the repository online and then ‘cloned’ it to create a local repository on your computer. To do this on the command line: open the git shell, navigate to your local repository directory, and use the following command (e.g.):
git clone 'https://github.com/kevintshoemaker/Tutorial.git'Aside from creating a directory through github desktop, this is the easiest way to set up a local git repo!
- Add a new text file to the repository. Call it ‘README.md’. This is a standard markdown-format textfile that github will use to describe the repository to visitors. Open the textfile in a text editor. You can write anything you want in this file, using pandoc markdown format. For example:
## GIT Tutorial

This is from the 'stats chats' GIT tutorial in April 2017

For more information, go to [the statschats website](kevintshoemaker.github.io/statschats)
Go back to github desktop, and click on the “changes” tab. You should see your new file in there!
At the bottom of the GUI, you should see a window called “Summary”. This is where you describe the changes you have made. Once you write something in there you should see that the “Commit” button at the bottom becomes available to you. Click on that button.
Now that you have a committed change, it’s time to push that change up to the github repository. Click the “sync” button at the top. Now you have committed AND pushed your changes!
Add/commit/push a file to the repository using command line!
Let’s add another file to the repository. This time it is an R file. Let’s call it “test.R”.
Open up a shell (command) window. The easiest way is to use the GIT shell (on windows, may be called ‘GIT Bash’). Make sure that the shell recognizes the “git” command by typing “git” at the prompt and hitting enter.
Change the working directory of the shell window to your local GIT repository.
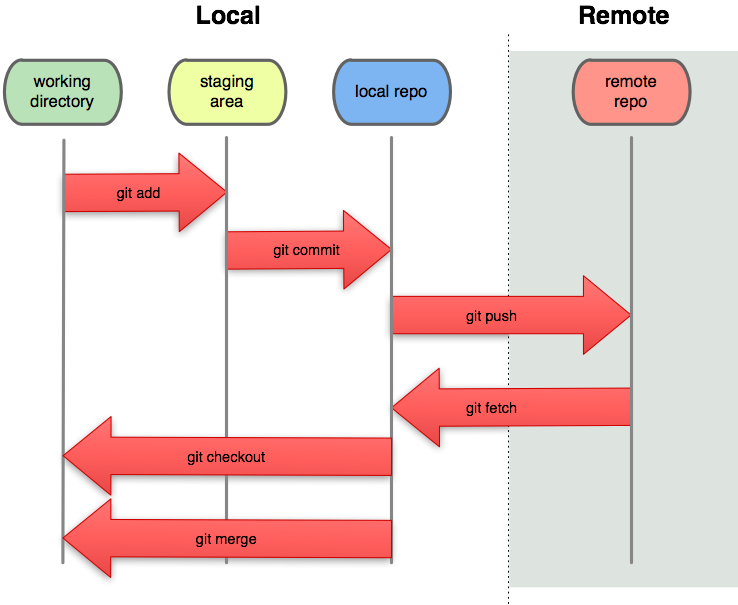
Let’s first add the new file (i.e., a snapshot of your current file) to the staging area. Use the command “git add”
git add 'test.R'Alternatively, you could use the wildcard function to add all R files:
git add '*.R'- Now commit the new file (that is, a snapshot of your current file) to your local repository. To do this use the command “git commit”. Remember that all commits must be associated with a message indicating the purpose of your commit. This is helpful when lots of collaborators are working on the project, or if you want to revert to a previous commit. Use the following syntax:
git commit -m "added new R file!"- Now you can push the file up to the repository:
git push -u origin masterNow that you used the -u command, you can push to the repository simply by using “git push”.
NOTE: this was particularly easy because we already configured the “tutorial” folder to be a local git repository, and GIT already knows the location of the cloud-based repository on github.
If we wanted to set up a local git repository from scratch, there are a few additional steps…
Setting up a GIT repository
The first thing we need to do is create a new directory. We can call it “tutorial 2”.
Open your GIT shell and navigate to this repository.
Initialize the new GIT repository. For this just use the command:
git init- Configure your new GIT repository.
Conflicts!!
Github Desktop does not currently have features for resolving conflicts. And conflicts WILL happen in any kind of collaborative coding project. So you need to know how to deal with this possibility. A good tutorial on resolving conflicts can be found here.
To resolve conflicts you can use the following command:
git mergetoolOther topics
- Forking repositories
- Contributing to existing github sites
- Working with RStudio and GIT
- Websites in github