Git tutorial
NRES 746
Fall 2023
Git tutorial
git (n). An unpleasant or contemptible person [British colloquial].
Linus Torvalds, the developer of Git and Linux stated that that he is egotistical and therefore: “I name all my projects after myself. First Linux, now git.”
Today we will run through a basic version control workflow in three different ways:
- GitHub.com (easy but not practical for most meaningful work)
- GitHub Desktop (graphical interface, easy to use and good for most tasks)
- command line (most powerful, a little more work to get started)
Install key software
First get a GitHub account from: https://github.com/. It’s free and easy!
Install GitHub Desktop from https://desktop.github.com/. This is a GUI version of Git that makes it easy to manage repositories that are hosted on GitHub.com.
Install VS Code text editor from https://code.visualstudio.com/. This is a powerful source text editor for coding that enables (among many other things) streamlined solutions for resolving merge conflicts in Git.
Let’s get started with Git!!
Overview of version control using Git
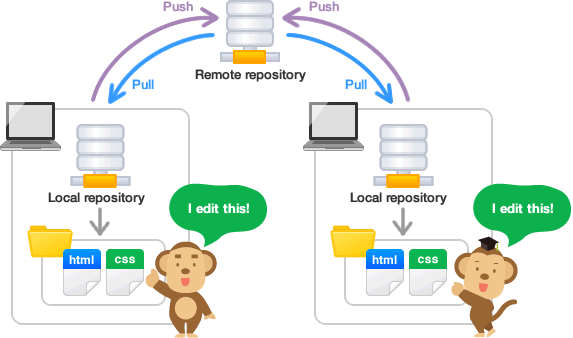
In a version control system, the repository (repo) is basically a container for all the files in a project. The repository can contain code, other text documents, images, really whatever you want…
There tends to be a single remote version of the repository. In a GitHub workflow, the remote version of the repository is stored in the cloud via GitHub.com.
Contributors to a project will often first clone the remote
version of the repository locally (git clone), make changes
to that repo (git add, git commit), and will
push those changes back to the remote repository
(git push). Prior to working on a project, users will often
pull the latest version from the remote repository to make sure they
have any changes that have been made by other project participants
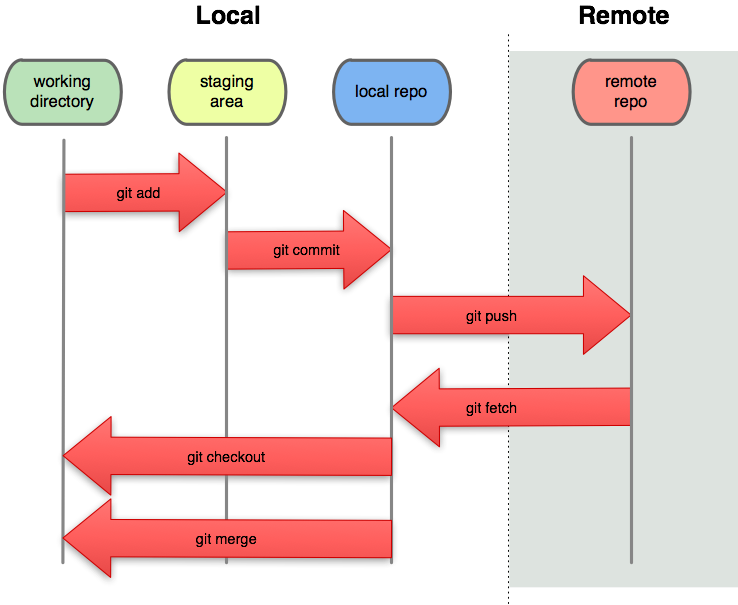
(git pull). So the typical workflow might look like:
- Clone the repo (create a local copy;
git clone) [only do this the first time] - fetch/pull any recent changes from the remote repository
(
git pull). - make and test changes locally (
git checkout>>git add>>git commit>>git merge) - push upstream to the remote repository (
git push)
Workflow #1: web-based, in GitHub.com
Step 1: create an online repository on GitHub.com
- Sign into GitHub.com
- At the top right, create a new repo using the plus sign icon
- Add a short description, and make sure the ‘add a README file’ box is checked
- Click “create repository”
- If you click “code” at the top of the screen you should see a file called “README.md”. This is a markdown textfile that you can use to describe your project!
Step 2: create a new development branch
We often want to make a branch so that we can test any new code before we commit it to the main trunk (the “main” branch, or trunk, is the ‘stable’ version).
To do this in GitHub, Click “Code” at the top of your repo. You will see “main” at the top left. Click that, and in the branch name (labeled “find or create a branch”) type “newbranch” and click “Create branch: newbranch from ‘main’”. At this point you have created a new branch, but they are identical (since you haven’t changed anything).
Step 3. make a change to your files and commit to the new branch
We are going to edit the README.md file that was automatically created for you when you made the repo. Once we do this, we are going to “Commit” the changes which means we are going to create a new version of our file (while preserving the original one). Usually you will edit code in your own developer environment, but we can do simple edits on the GitHub website for now.
- Click “Code”.
- Make sure you are in the “newbranch” branch shown at the top left. If you are still in “main”, drop that down and select the “newbranch” branch:
- Click the README.md filename, then click the “Edit this file” icon (the little pencil).
- Make any change to this file. Note that this is a markdown file, so you can create headers, italics etc just like you would with RMarkdown!
- Once you are done, you are going to save/commit changes (simultaneously for now, when we start doing real coding these will be separate steps). Write something helpful (but short, under 50 characters) in the Commit changes boxes, like “README.md edit to tell the world about myself”. Click “Commit changes”.
- Confirm you are still in the “newbranch” branch, and click the README.md file. Check to make sure it has your changes.
- Now change the branch back to “main”. Check the README.md file again and you should see the original file! You have preserved both versions of the file!
Step 4: merge the change back to the main branch
We are going to create a “pull request” to merge our new README.md into the main branch and then merge the pull request into our main branch.
- At the top of your repo, click “Pull requests”.
- Create a “New pull request”. At the top, set the “base” to be “main” and the “compare” to be whatever you named your new branch.
- Take a look at the comparison. It should show additions and subtractions from the original README.md.
- Click “Create pull request”.
- Title your pull request and write a description of the changes, e.g. “Wrote a header in markdown”.
- Click “Create pull request”.
- Now we’ll merge the changes. Start by clicking the “Pull requests” at the top. You will see your pull request show up. Click it.
- Click “Merge pull request”, and then “Confirm merge”.
- Now that a merge has occurred, it is good practice to delete the branch. You can always create a fresh branch for new features. Do this now, “Delete branch”.
Workflow #2: version control using GitHub desktop
First make sure you have downloaded the GitHub desktop software
- Open GitHub Desktop, and configure with your GitHub account info. (you only need to do this once)
- In GitHub.com, click on the green ‘Code’ button and select “Open
with GitHub Desktop”. This will clone your repository to a default
location such as Documents/GitHub/
. - Alternatively, you could have cloned the repo from GitHub Desktop: File >> Clone repository.
- Find your local working directory for the repository. Make sure the README.md is in there! You can edit it if you’d like using any text editor.
- Create a new textfile in your working directory- for example, a file with the .R extension. You could create a new R project in this directory if you’d like!
- Go back to GitHub Desktop, and make sure the new changes appear in
the left-hand panel. Any changes in the left-hand panel will be included
in your next commit unless you tell Git to ignore those files…
- In the lower left, type a name for your commit, and then press the button “Commit to main”. This officially adds these changes to the repository.
- In the top banner, click on “Push origin”. This will copy your recent changes into the remote repository on GitHub.
- Go to GitHub.com and make sure your new changes are there now!
Note that every time you start working on a collaborative project, you will probably want to click on “Fetch origin” at the top to make sure you’re working on the most recent version. Also, this includes projects where you are collaborating with yourself- that is, working from several different computers, each with its own local version of the repo.
CONFLICT!!!
- make a change to line 2 of your README.md file. For example, add the text “this is brilliant code, keep this!”.
- Commit your changes but do not push them back to the remote repo on GitHub.
- Go to GitHub and edit line 2 of the README.md file in the main branch. For example, add the text “genius code here, this must stay”. Commit this change to the main branch.
- Back in GitHub Desktop, try to push your new commit upstream to GitHub. You will find that you are not allowed to do this because there are new changes in the remote version.
- Use the ‘pull changes’ button to download the new changes from GitHub.
- GitHub desktop will tell you that you have a conflict that must be resolved before you can move on.
- Choose the option to resolve the conflict using VS code - this will open the VS code text editor and allow you to resolve conflicts manually.
- In VS code, choose the option to keep both “current” (local) and “incoming” (from GitHub) edits. Then save the file.
- Back in GitHub Desktop, push the changes back to GitHub.
- You are done- you have resolved your first conflict!
More on GitHub Desktop
GitHub Desktop is a general tool for working with GitHub repositories.
- You can clone or create new repositories using the file menu.
- You can post issues/bug reports to GitHub
- You can create and checkout branches, and merge branches
GitHub CLI is for those who prefer working in the command line. We won’t work with GitHub CLI, but just know it has most of the same functionality as GitHub Desktop.
Workflow #3: version control with Git command line
GitHub Desktop is great and all, but if you want to use Git you should have a basic knowledge of the Git command line. So let’s run a quick workflow in the shell/console as well!
Here are some of the basic Git commands:
git status- check to see if there are unstaged or staged changes to the local respository. Always good to run before doing anything!git log- inspect previous commits.git diff- inspect unstaged changes between your current working directory and an official version of the repo.git checkout- switch between different branches of a repository.git clone- fetch materials from a remote repository.git add- add materials from your working directory to the staging area.git commit- officially add files in the staging area to the newest version of the repository.git fetch- update the local copy of ‘remote’ (basically, record any changes made to the remote repo on GitHub)git merge- take any modifications/additions from one version of the repo and incorporate those into the current versiongit push- update the remote repo (GitHub copy) with any recent changes to your local repo (changes made since you last pulled/fetched from the remote repo)git pull- update your local repo with any recent changes that have been made to your remote repo (changes made since you last pulled/fetched from the remote repo) (this both fetches from the remote and merges with your current working directory files)git reset- clears the staging area (–hard option also overwrites any changes in the working directory)
Step 1: make sure you have a local repo to work with
We have already done this via ‘cloning’ from GitHub using GitHub Desktop, so no need to do this again. But just for the experience, you might want to create a new repo in GitHub Desktop…
Step 2: add files to the repo and commit them
- Open up your favorite text editor (e.g. VS Code, Wordpad, RStudio) and create a new file (e.g., a new “*.R” file) in your working directory associated with your local git repo. Open the file and type in some random code, whatever you’d like! In VS Code (if you’re using it) just use File >> New file or click CTRL+N.
- Open the command-line environment from GitHub Desktop by going the ‘Repository’ menu and clicking ‘Open in Command Prompt’. Your git settings (name, email) should already be set, and your base directory should already be set to your git project working directory, so you are ready to go!
- To see if there are new files (there should be!) type the following
in the command line:
git status. You should see your new file listed as an untracked file. - We are now going to “stage” the new file. First type
git add <<your filename>>. This puts your new file in the staging area. You can use wildcard characters here– for example,git add *.Rto add all R files to the staging area. - Then type
git commit -m "<<your commit message here>>". Note that this commits to your LOCAL repo, not to github (yet).
- Now we are going to PUSH the changes to a specific branch on GitHub.
To do this, type:
git push. NOTE: there is not necessarily a good reason to do this on the command line if you are comfortable using GitHub Desktop. Also, you may be prompted to enter your username and password. It is important to note that the password is NOT your GitHub account password but instead is a personal access token that you must create in GitHub.com. So if you really want to do this you would need to go to GitHub.com, click on Settings (in dropdown associated with your profile image in the upper right corner) >> Developer settings >> Personal access tokens. Click on “Generate new token” and make sure ‘repo’ is selected under ’Select scopes. BUT don’t feel like you need to do this, you can just push to GitHub using GitHub Desktop! Also, if you want to interface regularly with GitHub through the command line, you should install and learn about GitHub CLI- the command line interface for GitHub (e.g.,gh authto authenticate the connection with GitHub so you don’t have to deal with tokens!) - If you navigate to the repo on GitHub.com, you will see your new file added to the main branch!
Step 3. pull new changes using command line
- In GitHub.com, make some changes to the README.md file and commit these changes to the main branch.
- Back in the command line editor, type
git status. You should not see any evidence of the change you made in the remote version. - Now type
git fetchin the command line, followed bygit status. Now you should see the changes- because you have downloaded these changes locally using the fetch command. However, you have not yet integrated these changes into the working directory (the files you are actually working with). To do this, typegit pull. Now you should see the changes reflected in your local version of README.md.
Undoing a commit
Sometimes something may go terribly wrong with a commit. For example, you accidentally commit a file that is too big to store in Git (100 MB- this has happened to me several times). Here the easiest thing to do is to go into the command line and run the following commands:
git commit -m "Something terribly misguided"[this is you making a terrible error]
git reset HEAD~1[this undoes the commit by reverting to the previously committed version]
- edit the files as necessary- e.g., delete the large files!
git add <<whatever files you still want>>[now re-add any changes you actually want from your working directory]git commit -c ORIG_HEAD[commit the new changes]- go back to GitHub Desktop and push (publish) the changes up to GitHub.
Other topics
- Forking repositories
- Contributing to existing GitHub projects
- Working with RStudio and Git
- Websites in GitHub
Resources
Click on this link to access a fairly comprehensive tutorial on Git.
For more info on branches and merges, take a look at this informative post
If you want to avoid GitHub Desktop…
Some folks just like command line (terminal) better, and just don’t want the GUI functionality. Here are some installation instructions for those people! (this is borrowed from Dr. Greenberg’s recent tutorial for GRAD 778).
Also, you may find you occasionally want to use Git outside of GitHub Desktop, so it can be nice to just open up your shell/console and use Git directly- this is easiest if you just install Git and GitHub CLI as directed below.
Please refer to Dr. Greenberg’s workshop for more information on git and github using the command line.
Install Git and GitHub Command Line Interface (CLI).
Git contains the base command-line functionality for version control, and GitHub CLI makes it easier to work with a repository that is hosted on GitHub. Note that GitHub Desktop already contains a version of Git but it’s easier if you install it separately for command line usage- sorry!
- Windows:
- Install Git: https://Git-scm.com/downloads (use installation
defaults)
- Install GitHub CLI: https://GitHub.com/cli/cli/releases/tag/v2.2.0
- You probably want the “gh_2.2.0_windows_amd64.msi” version
- Install GitHub CLI: https://GitHub.com/cli/cli/releases/tag/v2.2.0
- Install Git: https://Git-scm.com/downloads (use installation
defaults)
- Mac:
- We are going to do this using “HomeBrew” to do our installations. If you’ve already installed HomeBrew previously, you don’t need to do this step.
- Please first install HomeBrew by opening Terminal and:
/bin/bash -c "$(curl -fsSL https://raw.GitHubusercontent.com/Homebrew/install/HEAD/install.sh)"- If it asks you for a password, this is your local Mac password.
- Next, update Homebrew:
brew update- If you get an error, try running these lines:
Git -C /usr/local/Homebrew/Library/Taps/homebrew/homebrew-core fetch --unshallow Git -C /usr/local/Homebrew/Library/Taps/homebrew/homebrew-cask fetch --unshallow brew update- Now install Git and GitHub CLI:
brew install Git brew install gh - Other OSs: Please check: https://GitHub.com/cli/cli#installation
Some definitions
- Version control: a system for tracking changes among different versions of a project, branching and merging versions of a project, differentiating between different versions, handling merge conflicts, reverting to old versions, etc.
- Repository (repo): a container for all the files and folders needed for your project. In a typical Git/GitHub workflow, repositories are stored both locally and in the cloud. Version control systems enable tracking, merging, restoring different versions of a repo.
- Git: a widely used, open-source, system for version control.
- GitHub: web-based system for storing repositories in the cloud and interfacing with these repositories using the Git version control system.
- main branch: the ‘official’ or ‘stable’ version of the repository (‘main’ is the default name for this branch in GitHub) (you will typically have both local and remote copies of the main branch)
- branching: creating a new parallel version of the project
within the repo (‘development branch’) that is not yet ready for
primetime. You can add to this branch and use it for testing until you
feel it’s ready to merge it back into the main branch (stable
version).
- staging: proposing some new files or edits for version control within a branch of your repo.
- committing: making staged changes ‘official’ (formally add a staged edit or addition to the repository as an official ‘version’)
- push: export any changes you have make within your local
repository ‘upstream’ to the remote copy of the repository.
- pull/fetch: import any new changes that have been made in the remote repo into your local copy of the repository. Pull and fetch are actually a bit different, but in this demo will basically be used interchangeably.
- origin: shorthand for the remote version of a Git repository, often stored in GitHub.
- HEAD: the most recently committed version of a repo branch
- cloning: creating a fresh local copy of a repository from a remote source (usually GitHub).
- forking: copying someone else’s repository into your own account so you have full edit privileges. (this is specific to GitHub)(you can use this to propose changes to other people’s projects)
- pull request: asking permission to merge some proposed edits (e.g., in the form of a development branch or fork) into a project- either your own project or someone else’s!